
Episode 2 – Talking to the daemon
[If you missed Episode 1 you can read it here]
Ok, my prototype web radio player seems to work as any modern device will do: through an app on your smartphone….which is cool, but somehow ‘suboptimal’ (or so I think) for a kitchen radio that should be operated quickly with dirty or wet hands: I want the radio controls back. And, besides that, I really love buttons and knobs.

Here’s where the RPI GPIO pins come to our rescue: they can be used to connect sensor and input devices to the board allowing a direct, more ‘physical’ controlh over it. But let’s start from the beginning looking closely at how PiMusicBox and, more specifically, the already mentioned Mopidy, works under the covers.
Mopidy is an implementation of the MPD (which stands for Music Player Daemon) server: in other worlds is a server process running on your Raspberry that exposes an interface based on the MPD protocol. Beware: as said, is an implementation of the protocol, so it has nothing to do (in terms of code) with the MPD server project. Since the protocol specs are available, there are lots different clients already available, ranging from very basic scripts to very sophisticated applications: one of them, probably the most essential, is packaged with PiMusicBox. Its name is ‘mpc’ and is a command line interface, which makes it the perfect choice for our purpose since can be easily invoked from within a script…there’s even a man page for it! Usage is very easy, once you understand the playlist-based way of working of Mopidy (see Episode 1): to load a playlist just type in a console:
mpc load <playlist name>
and to play a specific track/stream
mpc play <item number>
Similar commands are available to adjust volume, to add or remove tracks from the playlist and so on (check the man page linked above to have a detailed list of all the available commands and options).
The basic architecture of the ‘system’ began to take shape:

All the components are already there, the ‘only’ thing still to do is deciding what kind of hardware we’d like to wire to the Raspberry board and to write a suitable script to control it. NOTE: I’m aware that there are some modules like this one more or less ready to be used, but I’de like to develop my very own to learn something in the process.
The bare minimum set of things to control are just the following two:
- radio station selection (thus the ability to select a specific stream from the stream playlist)
- volume adjustment.
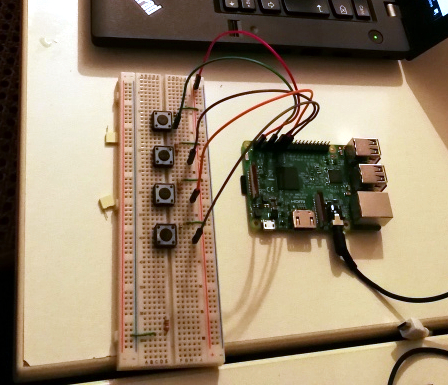
The standard method of interacting with Mopidy (the mpc calls) is the same for each function we’re going to add, so let’s start with the volume, the easy one (no need to load a playlist). A basic setup consists of a couple of buttons wired to two GPIO pins configured as inputs as explained here (please, forgive me for not going into the wiring details, I think is trivial enough to be skipped without too much damage :-)).
Once the hardware part is done, a suitable script is needed to capture the input from the button themselves. There are plenty of examples on the Net, so if you’re lazy (as I am), just copy and paste the one you like more. Once the button state is red, calling mpc from within the script is a pretty straightforward task, just manage it as a usual system call. In my python code I use the subprocess module:
supbrocess.call([“mpc“,”volume”,”+10″]) # Increase volume by 10%
The call syntax seems a bit weird, but it will become clearer once you dig into the appropriate documentation.
Now, enough for the volume part. The station selection part can be built wiring two more buttons but requires some additional step on the Mopidy side to work properly: we’ll need to make Mopidy first to load the playlist and then to play a specific stream. One idea (that I followed in my script) is to have a setup() routine that performs the initial load at the start:
subprocess.call([“mpc“,”load”,”[Radio Streams]”])
Remember that, as mentioned in Episode 1, the playlist file containing the Streams is called by default [Radio Streams].m3u and is located in the /music/playlist folder (but this can be changed in the settings file).
Once the playlist is loaded you can use the button to navigate through it or to play specific stream:
subprocess.call([“mpc“,”next”]) # play the next stream in the list
subprocess.call([“mpc“,”prev”]) # play the previous stream in the list
subprocess.call([“mpc“,”play”,”3″]) # play the third stream in the list
Here there is an issue: since the playlist is loaded by Mopidy, it is ‘invisible’ to your script unless you retrieve it from Mopidy itself. I was interested in showing the current playing station name (the info is available in the playlist file), so I just make my script load a copy of it independently from Mopidy: this way, whenever a ‘play’ event is detected (the button is pressed) the script:
- calculates which is the stream to be played (next or previous);
- retrieves the station name and position from the in-memory list;
- call mpc to play the specified stream
As you can see the control is sitting on the script side which has the responsibility of identifying the stream to be played, thus avoiding any misalignment between the track owned by Modipy and the one visible to the script.
One final thought on how to intercept GPIO input state, your buttons included. From the bottom of my knowledge I understood that there are basically two strategies to address this item: polling or interrupts.
Polling is the usual method you’re going to find in lots of online tutorial and examples: you write an infinite loop (the while True construct) that periodically checks all your input state and acts consequentially. Usually, the loop contains a sleep() statement to avoid to saturate the CPU. In principle, it works as long as the sleep time is negligible if compared to the input variation period or speed, think of a temperature sensor for instance, but problems arise when you have fast-changing values. In order not to skip any of them you’re forced to reduce the sleep time to a very minimum, making this approach very inefficient when changes are followed by a long period of time when nothing happens (CPU runs at high utilization % even without any event to process).
Using interrupts and callback functions, on the other side, is preferable when dealing with user input that typically lasts for a very short time (button pressed) but happens ‘rarely enough’. In this case, the main thread of the program can be used to do something more useful than wait for input, as reading and playing a music stream for example, while a separate thread waits for a specific input on specific GPIO pin. The whole thing is managed at kernel level, so the waiting thread is put on hold and consumes zero CPU. Once the specified input is detected, the kernel wakes up the sleeping thread which, in turn, executes the code contained in the callback function and gets back to sleep avoiding to waste CPU resources. For details about interrupts on the Raspberry PI just use Google (joking)! A good and understandable explanation is in this discussion, while here there is a very basic tutorial on how to practically use them.
In my script I tried both ways and, needless to say, the interrupt approach gave me the best results in terms of reliability and resource usage…only remember to add a proper debounce time to your buttons!
Next time….less is more (Episode 3)!
Stay…tuned!


Pingback: RadioBerry! (4) | The Monday Morning Tech Newsletter