Recently I spent some time looking for a smart way to interact with my ‘Internet-enabled’ devices (basically Arduino + sensors, LEDs + Ethernet shield combinations) through a web interface. There are a lot of projects already completed and working out there, but my nerdiness imposed me to build my very own starting from scratch. The basic idea, not very original, is to have a technology stack that allows the device to send and receive data using standard TCP/IP connectivity.
The REST option
First thought I had is to implement something like a REST API (REpresentational State Transfer), using an application server to host the web interface pages and to answer the requests coming from the device. The thing could be suitable to receive data from the device assuming to have a properly ‘ajaxed’ web interface and not pretending a real-time monitoring: the endpoint device can publish data on the server through a REST call periodically or when triggered by an external event, and the client will read them within a web GUI using a different set of APIs, possibly called by some Ajax component.
The issue here is that this is not a real ‘push’ solution: every data is polled by the client that each time needs to setup an http connection, without knowing if there’s something new or not. The polling frequency has to be defined in advance: an unexpected increase in the data changing rate could lead to significant losses on the client side (think about a messaging application) unless some kind of specific buffering technique is implemented on the server itself.
The same thing can affect the endpoint capability to answer to command issued by the web interface: as long as the device doesn’t open a request to the server to get the new command (if any), issuing commands from the web interface goes completely unnoticed.
A quick and dirty (but partial) solution is to increase the polling rate (both from client and device sides), but this comes with a price in terms of bandwidth and computational overhead, and this can be a real pain when working with low power devices like the Arduino.
MQTT: the Internet of Things standard protocol?
Things changed when I came across some documentation about the MQTT protocol, which seemed to me exactly what i was looking for. MQTT, which stands for MQ Telemetry Transport, is born to enable M2M communication between devices with limited resources (small memory footprint & bandwith) and, to be honest, is not really new: the first version was designed by Andy Stanford-Clark from IBM, and Arlen Nipper from Arcom (now Eurotech), in 1999. Since then it has been embedded in many different products and systems: the Facebook Messenger application, as an example, is built on it (here an article about this topic from Lucy Zhang, a software engineer at Facebook).
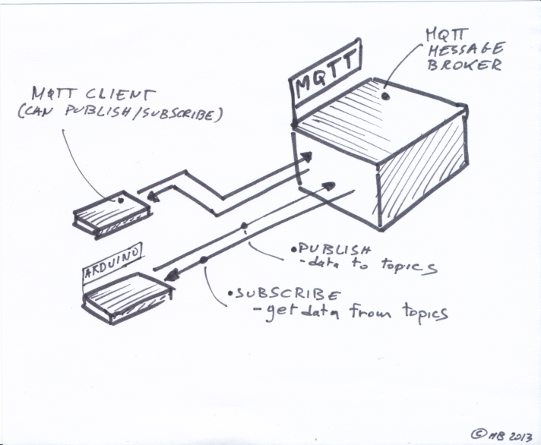
How does it work? From a high perspective it is a basic client/server messaging protocol that includes a Publish / Subscribe mechanism: a client publish a message on a specific queue (called ‘topic’) hosted by a message broker, and another client can receive it by subscribing to the topic. Each client is able to publish and receiving messages at the same time, and communications occurs between each client and the message broker(s). Two clients won’t be able to exchange messages without a broker in the middle.
The most relevant difference if compared with HTTP, which is the protocol usually behind REST implementations, is that MQTT establish a stateful connection, allowing this way near real time communication. If you’re interested, the complete MQTT V.3.1 specifications are available here within the IBM developerWorks network. The protocol specs are completely open, so everybody can build his very own MQTT application. The Eclipse Project, which currently leads the MQTT software related development (protocols implementations, the Mosqitto broker, Paho) has a specific section that hosts some Open Source implementation of servers and clients in several languages.
Ok, let’s give it try!
1. The broker
First off, I wanted to find an MQTT messge broker freely (or near freely) accessible on the Net, and after some googling I found those guys who run exactly what I needed. It requires a quick signup and you’re done, you have your broker.
Topics on the broker are defined as: [DOMAIN]/stuff/[THE STUFF]/things/[THE THING], where DOMAN is a unique identifier bound to a specific user account, THE STUFF is basically a name that, within a domain, can identify a particular device or set of MQTT talking ones, and THE THING can represent specific thing that a topic is referred to.
As an example, imagine that THE STUFF is a weather station and THE THING is, say, the temperature sensor: the topic “[DOMAIN]/stuff/weatherstation/thing/temperature” can be used to publish temperature data.
All the MQTT messages exchanged through this broker needs to be in a standard JSON format.
Please Note: all of this are specific to the implementation of this broker only, and are not part of the MQTT protocol: I added this description only to make scketches more readable. MQTT protocol is completely agnostic on message or topic naming convention.
2. The device
I already had some spare Arduinos around, and by adding an Ethernet shiled I got an Internet enabled device. As we all know, Arduino can be exploited to do almost anything. In this case I was more interested in communicating with the world rather than performing some useful action, so, from the hardware side, I wired up just a LED and an RTC chip (a Real Time Clock): I wanted to be able to receive the device uptime and to control the LED from my web interface to test a two-ways communication (each endpoint is both a publisher and a subscriber).
The scketch running on Arduino is based on the mqtt library developed by Nick O’Leary and does two things:
- as a subscriber of the topic “[my domain]/stuff/Arduino/things/hearbeatclock”: receives commands in the form of MQTT messages and processes them. Currently it can only receive two messages, one to turn on the light and another one to turn it off;
- as a publisher on the same topic: get the uptime from the RTC and publish it .
Below the relaevant part of the sketch (I omitted all the code related to RTC communication and led control):
#include <SPI.h>
#include <PubSubClient.h>  // the MQTT library
#include <Ethernet.h>

// MQTT relevant define statements:

#define M2MIO_USERNAME "user name" // username to connect to broker
#define M2MIO_PASSWORD "password"  // password to connect to broker
#define MQTT_SERVER "q.m2m.io"     // broker address

// define statements not part of MQTT specs but needed to talk to m2m.io

#define M2MIO_DOMAIN "the domain"        // user domain
#define M2MIO_DEVICE_ID "the device ID"  // device ID

// MAC Address to initialize the Ethernet Shield
byte MAC_ADDRESS[] = { 0x90, 0xA2, 0xDA, 0x0D, 0x9A, 0x4C };
// declaring the Ethernet Client
EthernetClient ethernetClient;

// building the PubSubclinet
PubSubClient sensorClient(MQTT_SERVER,
        1883,             // MQTT standard comm port;
        sensorCallback,   // pointer to the function that processes
                          // the received data on subscribed topics;
        ethernetClient);  // a Client, usually EthernetClient

// buffers for  storing common data:
char clientID[100];
char topic[100];
char msg[100];
char message_buff[100];

void setup()
{
    /* omitting stuff to initialize:
     *   - SPI bus used by Ethernet & RTC;
     *     - pins;
     *     - topic, clientID, etc...

    // initialize ethernet library
    if (Ethernet.begin(MAC_ADDRESS) == 0)
    {
        Serial.println("Failed to configure Ethernet using DHCP");
        return;
    }
}
void loop()
{
    now = millis();
     // connects to MQTT broker and subscribes totopic
     if (!sensorClient.connected()) {
        sensorClient.connect(clientID, M2MIO_USERNAME, M2MIO_PASSWORD);
        sensorClient.subscribe(topic);
    }

  // loop runs more frequently than we'd want to pubish
  // only publish every "reporting interval" milliseconds
  // (REPORTING_INTERVAL_MS defined elsewhere)

     if ((now - sentTime) > REPORTING_INTERVAL_MS) {
       sentTime = now;
       String dataMsg = [A MESSAGE HERE] //(m2m.io pretends JSON msgs)
       dataMsg.toCharArray(msg, dataMsg.length()+1);
       sensorClient.publish(topic, msg);  // Publish !
     }

    sensorClient.loop(); //keeps connection open, otherwise could be
                         // closed after a specific timeout
 }

// handles message arrived on subscribed topic(s)
void sensorCallback(char* topic, byte* payload, unsigned int length) {

  char message_buff[100];
  int i;
  for(i=0; i<length; i++) {
    message_buff[i] = payload[i];
  }
  message_buff[i] = '\0';

  String msgString = String(message_buff);
  // do something with the received message.

 }
The MQTT library has to be installed as a standard Arduino library, and contains several useful examples on how to use it.
3. The Web Interface
This part posed a relevant issue due to the technology underlying an HTTP browser: one of the previous limitation was the unability of setting up a TCP socket, basically a persistent connection, from within a web page. This is a basic requirement to work with MQTT.
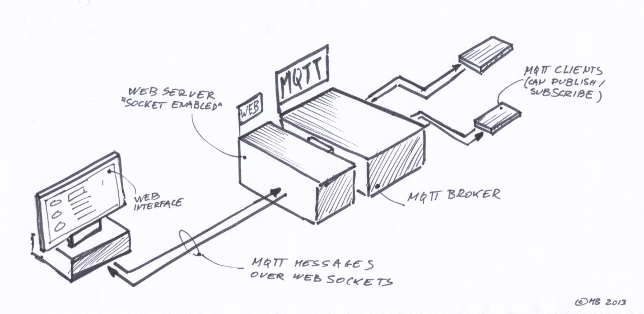
Thanks to the introduction in 2011 of the WebSocket specification , this is no more a big problem, since quite all the modern browsers support it. A WebSocket is a full duplex communication channel over a single TCP connection, and it’s based on a specific protocol, different from HTTP (the only part they have in common is the handshaking process that is interpreted from the server as an ‘upgrade request’). In any case, a WebSocket is exactly what is needed to implement a MQTT enabled web interface.
The overall architecture now is something like that:
To make it work, my first try had been an (extremely poor) interface based on the Paho Javascript client to setup and manage WebSockets and MQTT. A real documentation is still missing (anyone want to contribute?) but the comments within the .JS file are pretty explanatory. Unfortunately (not enough time to investigate) it seems to be not compatible with the broker setup, most probably due to the different URL syntax expected by the JS client (but I could be wrong). Anyway, to save me time, i just downloaded and adapted the MQTT js library (called ‘mqtt-ws.js’) which this web interface, written by the owners of the broker, is based upon.
Now I can communicate with my device from the web. This was only a proof of concept, and I have to admit that most of the involved code comes from somewhere on the Internet (cut&paste has been widely used). Next step is to add my broker (thinking of using the already mentioned Mosquitto) to have more control on what’s going on.
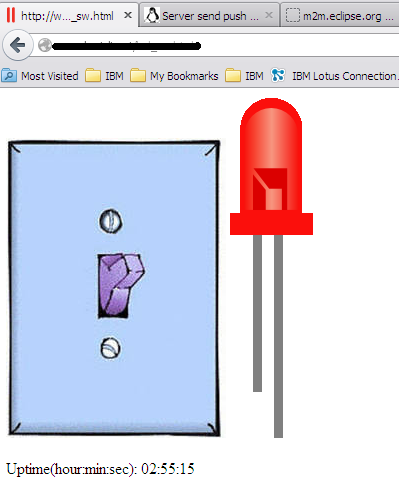
Oh, and look at the awful GUI i was using: definitely a great area of improvement!


Pingback: Playing with MQTT | Open Source Hardware News |...
Hello Adrian,This is my firs Arduino and I also want to make exactly the same thing as you did but i have stlbmued across a serios of problems because some of the code that I am using in my arduino is writen in romanian and I don’t know exactly what to change in my code.Could you please help me ? The thing is that my arduino has Temperature, Humidity, Pressure and light sensor and there is a lot of code I must go through.Kind Regards,Flaviu Vlaicu
Hello Flaviu!I might be able to help you, but I need to know what kind of sensors you have. Is it a cimnobed temperature, humidity and pressure sensor or are they separate? You need to find the part/model numbers. My temperature sensor is a DS18S20 digital temperature sensor.
great article, always love proof of concept blog. thank you.
one question, I’ve read from everywhere that MQTT is agnostic. what does that mean?
wondering if I could stream(broadcast) multimedia using MQTT?